Every client that speaks MCP can connect to MiroMiro with one URL. Paste https://miromiro.app/mcp into the client's connector settings and nine design-extraction tools appear in your chats: section-to-code, brand, design tokens, images, SVGs, fonts, videos, audio and Lottie.
You do not need to paste a key. The bare URL triggers a one-click sign in with your MiroMiro account - free, 300 credits a month, no card. Client-by-client steps below.
Claude - web and desktop
Claude calls these custom connectors. Two ways in:
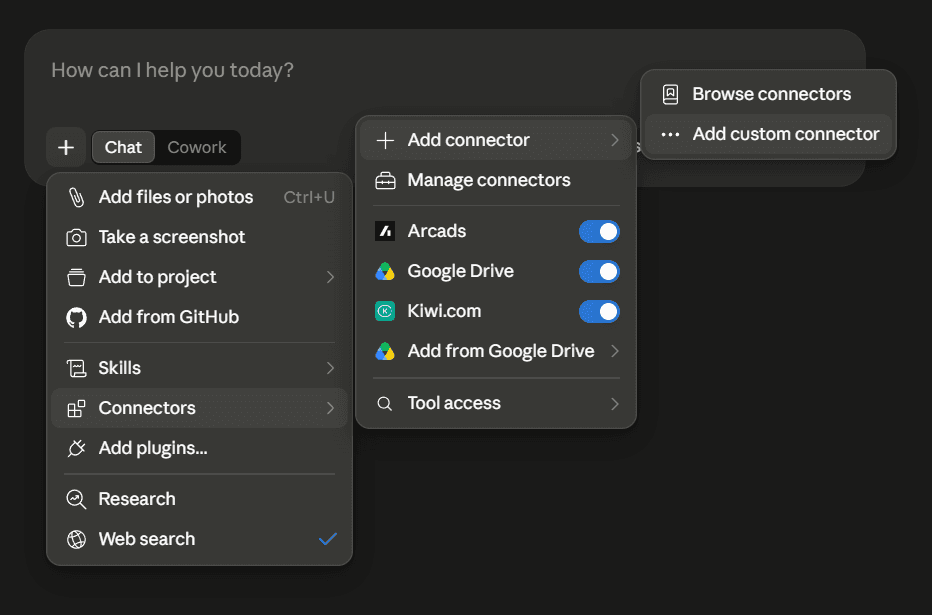
- In any chat, click the + button in the input, then Connectors → Add connector → Add custom connector. (Settings → Connectors gets you to the same dialog.)
- In the dialog, fill in:
- Name:
MiroMiro - URL:
https://miromiro.app/mcp
- Name:
- Leave the OAuth Client ID and Secret fields under Advanced settings empty - Claude discovers them from the server.
- Click Add. Claude opens the MiroMiro sign-in page; approve it and the tools are live in every chat - ask "get the brand colors and fonts of stripe.com" and watch it call
extract_brand.
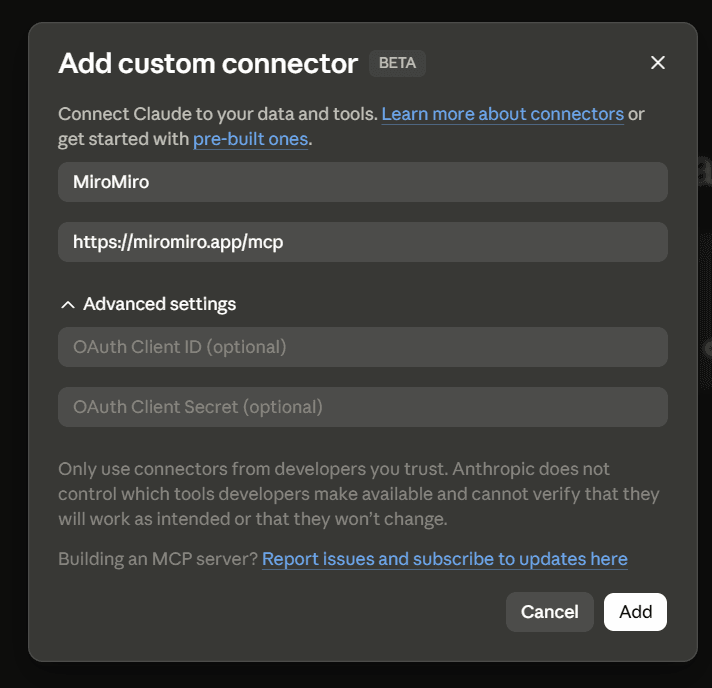
One click faster: Add MiroMiro to Claude opens this dialog with the name and URL pre-filled - you just click Add and sign in.
Cursor
Cursor supports install deeplinks, so Add MiroMiro to Cursor does the whole thing in one click - it opens Cursor with the server config pre-filled. Manual version, in ~/.cursor/mcp.json:
{
  "mcpServers": {
    "miromiro": {
      "url": "https://miromiro.app/mcp",
      "headers": { "Authorization": "Bearer mm_live_your_key" }
    }
  }
}
Drop the headers line and Cursor prompts you to sign in instead - either works. If you do use a key, the header keeps it out of logs. Restart Cursor and check the MCP panel for the nine tools.
ChatGPT
ChatGPT only takes remote servers, which is exactly what this is:
- Settings → Security and login → enable Developer mode
- Settings → Plugins (or go straight to chatgpt.com/plugins) → New Plugin:
- Name:
MiroMiro - Connection: Server URL,
https://miromiro.app/mcp - Authentication: OAuth - ChatGPT reads the sign-in settings from the server, so there is nothing to configure
- Tick the custom-server acknowledgment and click Create
- Name:
- ChatGPT shows a consent card. Click Sign in with MiroMiro, approve, and the tools appear in any chat via the + menu → More.
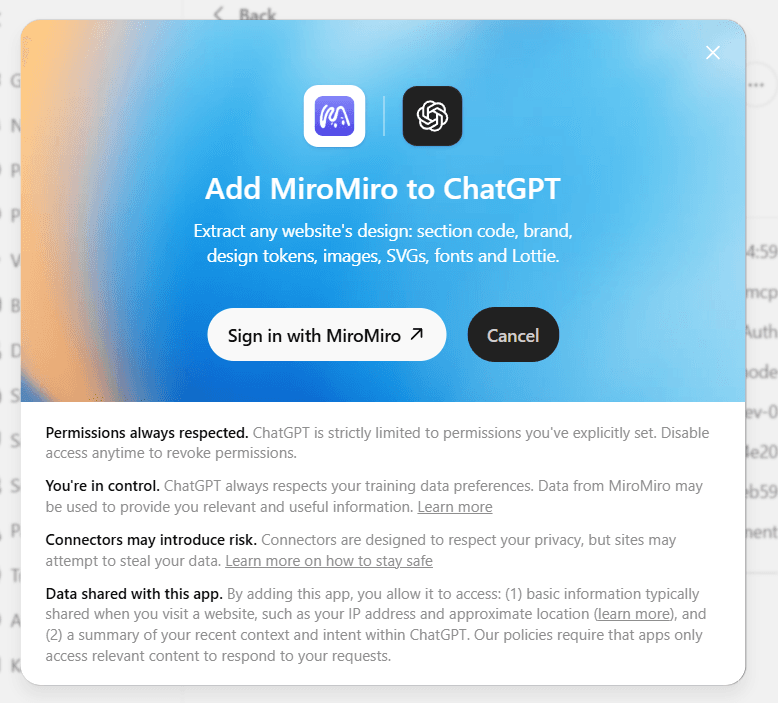
OpenAI has renamed this area twice recently - if your build still says Apps & Connectors, the Developer mode toggle lives under Advanced there instead.
Prefer to delegate? Paste this prompt into the assistant and let it do the guiding - ChatGPT walks you through its own settings, and Codex installs the server for real:
Add the MiroMiro MCP server to this client.

Server name: miromiro
Server URL:  https://miromiro.app/mcp
Transport:   Streamable HTTP (stateless JSON responses)
Auth:        OAuth (auto-discovered). On first connect you'll be asked to sign in to MiroMiro - a free account includes 300 credits/month, no card. API keys also work: append ?access_key=mm_live_YOUR_KEY or send "Authorization: Bearer".

If you are ChatGPT: Settings → Security and login → enable Developer mode, then Settings → Plugins (chatgpt.com/plugins) → New Plugin with the URL above (authentication: OAuth).
If you are Codex CLI: add to ~/.codex/config.toml:
[mcp_servers.miromiro]
url = "https://miromiro.app/mcp"
Then run: codex mcp login miromiro (signs in through the browser).

Then list the tools - you should see extract_code, extract_brand, extract_design_tokens, extract_assets, extract_svgs, extract_fonts, extract_videos, extract_audio and extract_lottie.
Codex CLI
Add to ~/.codex/config.toml:
[mcp_servers.miromiro]
url = "https://miromiro.app/mcp"
Then sign in once: run codex mcp login miromiro and approve in the browser. codex mcp list, or /mcp inside Codex, shows it connected. The command line and the IDE extension share this file.
To pin a key instead, add bearer_token_env_var = "MIROMIRO_API_KEY" under the URL and set that environment variable, or use url = "https://miromiro.app/mcp?access_key=mm_live_your_key".
Claude Code
One command in your terminal, not inside a session:
claude mcp add --transport http miromiro https://miromiro.app/mcp
Then run /mcp inside a session to sign in - Claude Code opens the browser consent page once and stores the token. If you'd rather skip the browser, pass the key directly:
claude mcp add --transport http miromiro https://miromiro.app/mcp \
  --header "Authorization: Bearer mm_live_your_key"

claude mcp list   # look for "✓ Connected"
Claude Code also runs the local npm package if you prefer the key in an env var instead of a header.
Grok Bot, Muse and OpenAI dots
The newer agents take the same URL, each in its own way:
- Grok Bot has no field for a server URL in its settings. Ask the bot instead: "Add a custom MCP server called miromiro at https://miromiro.app/mcp". Confirm, press Authorize on the card it posts and sign in. It then shows under Settings → Plugins → Yours. Grok Bot runs on a cloud computer, so servers from your Cursor settings do not carry over. Grok Bot steps
- Muse: ask it in a chat to add a custom connector for
https://miromiro.app/mcp(remote streamable HTTP, OAuth), then approve the sign-in it opens. Some accounts also have Settings → Connectors → Add custom connector, which takes the same URL. Muse steps - OpenAI dots use the plugins switched on in your ChatGPT account, so the setup is the ChatGPT one above. Start with one small request to see it working. Dots steps
Each agent also has its own page with the steps drawn out: ChatGPT, Claude, Claude Code, Codex and Cursor.
Sign-in vs pasting a key
Both end up in the same place: signing in links your account and provisions a free API key behind the scenes, so the tiers are identical either way.
| Free account | Paid plans | |
|---|---|---|
| Results | Full | Full |
| Rate limit | 30/min | 60 to 300/min |
| Credits | 300/month | 5,000 to 200,000/month |
| Usage and logs | Dashboard | Dashboard |
| Price | Free, no card | From €19/month |
Sign-in is the better default: no key to store, tokens expire and refresh on their own, and revoking the connector kills access without touching your other keys. Paste a key only where a client cannot run the sign-in flow.
What to ask once connected
You never name tools in prompts - ask design-shaped questions and the agent picks the right one:
- "Rebuild stripe.com's pricing section in React"
- "Extract linear.app's design tokens and restyle our Button component to match"
- "What fonts does vercel.com actually load?"
- "Pull the brand palette from ourcustomer.com and generate a theme file"
Common problems
- "Invalid or revoked API key" in the tool result. The key in your URL or header is wrong or was rotated. Grab the current one from API Keys - keys are shown once at creation, so rotate if you lost it.
- The client keeps asking you to sign in. Remove the connector and add it again - a stale token from a revoked link is the usual cause. Tokens normally refresh on their own for 180 days.
- Thin results on an app-like site. The engine reads static HTML and CSS by default, so a fully client-rendered app returns little - and the tools say so instead of inventing values. The fix is one argument:
render: trueloads the page in a real browser and runs its JavaScript before extracting (+5 credits). The thin response includes a hint telling the agent exactly that. - Claude web has no header field. Correct - claude.ai custom connectors cannot send custom headers. You do not need one: the sign-in flow handles auth, and
?access_key=still works if you prefer a pinned key.
Already using the Figma MCP?
Keep it. Figma's server reads your own design files; MiroMiro reads live websites. They are both remote URLs and work side by side in the same client - the comparison and the Figma setup steps are in Figma MCP: setup and what to use without a Figma file.
Or skip MCP entirely
The same engine is a plain REST API:
curl "https://miromiro.app/api/v1/brand?url=stripe.com" \
  -H "Authorization: Bearer $MIROMIRO_API_KEY"
Full reference at /api/docs. You can start for free.
Frequently asked questions
How do I add a custom MCP connector to Claude web?
The + button in the chat input → Connectors → Add connector → Add custom connector. Name it, paste the URL, click Add, then approve the MiroMiro sign-in page it opens.
Do I need a key to try it?
No. Paste the bare URL and sign in with a MiroMiro account when prompted - free, 300 credits a month, no card. Keys are the fallback for clients that cannot run the sign-in flow.
Which clients does the remote server work with?
Claude web and desktop, Cursor, ChatGPT developer mode, Codex, Claude Code, Grok Bot, Muse, Windsurf, and any MCP SDK. If it takes a server URL, it works.
Where does my key go safest?
Header (Authorization: Bearer) where the client supports it - Cursor, Claude Code, SDKs. URL (?access_key=) only where headers are not an option - claude.ai, ChatGPT. Rotate keys anytime in the dashboard.
Skip the maintenance - one API call
Design tokens, brand data, fonts, SVGs, images, and section code from any URL. 300 free credits a month, no card.
Soraia · Founder, MiroMiro
Building MiroMiro: a browser extension and API that extract design tokens, assets, and production-ready code from any live website. The gotchas in these posts come from the extraction engine's own commit history.
Follow on X